Editing Existing Images with gpt-image-2: Masks, Inpainting, Variations
How to edit existing images with gpt-image-2: mask syntax, inpainting prompts, and variation workflows. Practical recipes for swapping backgrounds, products, and elements cleanly.
Image editing is where most AI workflows stop feeling magical and start feeling like real infrastructure. Generating a brand-new image from a text prompt is impressive but often not what you need — you need to change one thing in an image you already have. Swap the background of a product photo. Replace the coffee cup in the left hand with a tea cup. Extend the canvas to make a 1:1 into a 9:16. Keep everything else identical.
This is what gpt-image-2's editing endpoint is for, and it's meaningfully more capable than DALL·E 3's was. This guide is the practical handbook: how masks work, what inpainting prompts should say, when to use variations instead, and when a prompt-based Gemini route may be useful. The Adpicto editing path and the `IMAGE_EDIT_PROVIDER` env flag are covered too, if you want to follow how a production tool actually wires this up.
Before getting into masks and mode selection, here's a real example of what this exact generation pipeline ships in production — not a mockup, not a demo asset built for this post.
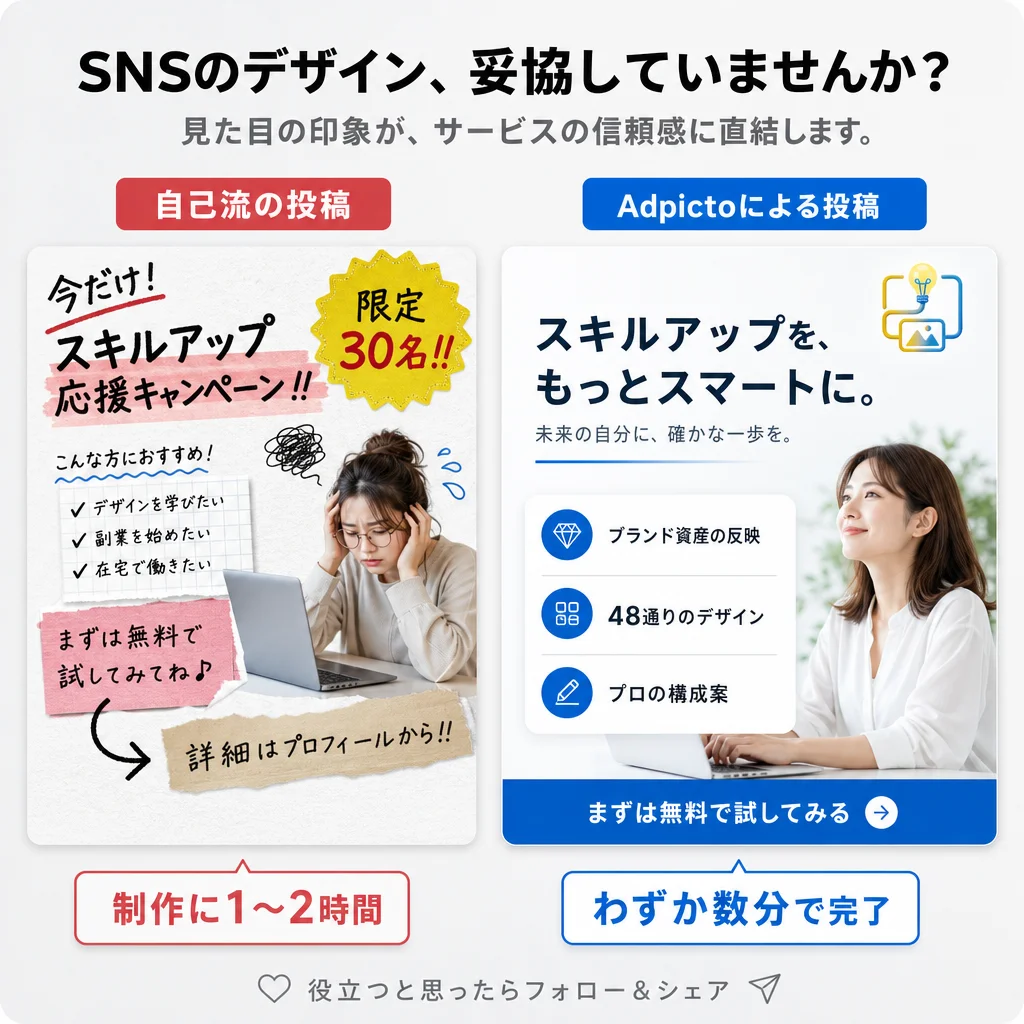
To be precise about what it shows: this is a straight gpt-image-2 generation, not a mask-based edit. Treat it as a reference point for the pipeline's output quality, not as a demonstration of the inpainting or outpainting techniques covered later in this guide.
TL;DR
- Inpainting (edit masked region): you provide an image, a mask marking the region to change, and a prompt describing what the masked region should become. gpt-image-2 fills the mask while keeping the rest identical.
- Variations (re-render with changes): you provide an image and a prompt describing the change; the model produces a new image close to the original with your edits applied. No explicit mask — the model decides what to preserve.
- Outpainting (extend canvas): you provide an image with transparent borders showing where the canvas should extend, and the model fills in the new area consistently with the original.
- Mask syntax: white = edit, black = keep. Most APIs accept PNG with alpha channel as the mask; transparent pixels are edited, opaque are preserved.
- Adpicto's in-app edit flow is prompt-based: users provide a source image and describe the change. The default edit provider is gpt-image-2 through OpenAI; set `IMAGE_EDIT_PROVIDER=gemini` to opt in to Gemini for edits. See the multi-model strategy post for the broader model-routing context.
Why Image Editing Matters More Than Pure Generation
Pure text-to-image is the flashy demo. In a real content workflow, you spend most of your time editing images you already have:
- Your product shot is perfect, but the background clashes with next month's seasonal palette. Swap the background, keep the product.
- Your team photo has five people and one of them left the company. Remove that person, keep the composition.
- Your hero image is 1:1 but you need a 16:9 for a landing page. Extend the canvas preserving the subject.
- Your AI-generated image is almost right, but the logo on the mug is wrong. Replace just the logo region, keep everything else.
How gpt-image-2's Editing Endpoint Works
gpt-image-2 exposes three main editing modes through OpenAI's Images API:
1. Inpainting (mask-based edit)
The most powerful mode. You send:
- An input image (the source you're editing)
- A mask (a second image, typically PNG, where transparent or white pixels mark the region to edit)
- A prompt (describes what the masked region should become)
For a narrower operational guide to mask preparation, masked-region prompts, and cleanup passes, see the gpt-image-2 inpainting deep-dive.
2. Variations (guided regeneration)
You send:
- An input image
- A prompt describing the change (optional)
3. Outpainting (canvas extension)
You send:
- An input image with transparent borders (e.g., an original 1024 × 1024 composition sitting inside a 1024 × 1920 canvas with the top and bottom as transparent)
- A prompt describing what the extended area should contain
Mask Syntax: The Part That Trips Everyone
Masks are where most people first stumble. The convention for gpt-image-2 (matching OpenAI's broader Images API) is straightforward once you know it:
- Transparent (alpha = 0) = the area to edit
- Opaque (alpha = 255) = the area to preserve
Creating a mask in practice:
- Open your source image in Figma, Photoshop, or any tool that can export PNG with alpha
- Duplicate the image layer
- Select the region you want to edit (the background, an object, a person, etc.)
- On the duplicate layer, erase everything except that selection — or equivalently, mask so only the edit region is transparent and everything else is solid
- Export as PNG
Mask resolution matters. The mask should be the same pixel dimensions as the input image. If they differ, behavior is undefined across providers — some upscale, some downscale, some reject. Always match dimensions.
For copy-paste prompt templates — including the mask-instruction phrasing — see our gpt-image-2 text and layout prompt recipes.
Inpainting Recipe 1: Swap a Product Background
Classic use case: you have a product photo with a cluttered background and you need it on brand-palette for a feed post.
Workflow:
- Input: your product photo (1024 × 1024)
- Mask: a PNG (1024 × 1024) where the product silhouette is opaque and the background is transparent
- Prompt: "Replace the background with a soft cream linen surface, gentle natural window light from the left, editorial product magazine style, subtle diffused shadow beneath the product. The product itself must not change."
- "The product itself must not change." gpt-image-2 sometimes bleeds edits into the masked region edges. This phrase reduces (not eliminates) that.
- "Subtle diffused shadow beneath the product." If you don't ask for a shadow, the new background can look like a badly composited cutout. Asking for shadow grounds the subject.
- Match lighting and palette to your brand reference. If your brand uses warm terracotta and cream, don't generate a cool blue background and then try to grade it.
Inpainting Recipe 2: Replace a Single Element
Example: your AI-generated hero image is perfect except the mug the subject is holding says "COFEE" (misspelled — a common AI failure). Mask just the mug and regenerate.
Workflow:
- Input: the hero image (1080 × 1350)
- Mask: a PNG where only the mug region is transparent, everything else is opaque
- Prompt: "A plain ceramic cream-colored coffee mug, held in the same position as shown, with no text or typography on it, matching the warm afternoon lighting of the scene."
- "Held in the same position as shown." Constrains the model to respect the existing hand pose.
- "No text or typography on it." Prevents the model from generating garbled text where the misspelled label was.
- "Matching the warm afternoon lighting of the scene." Links the new element to the scene's existing light.
Variations Recipe: Seasonal Palette Shift
When you want to change the overall mood of an image without redoing the composition, variations are faster than a masked edit.
Workflow:
- Input: your existing hero image
- Prompt: "Apply a deep winter palette — cool charcoal, deep navy, and soft silver highlights. Keep subjects and composition identical; only the color grading and lighting tone should change."
- You want a palette or mood shift, not a specific object change
- The change is global (color grading, time of day, season)
- You're iterating on concept and don't need pixel-perfect preservation of non-target areas
- You need a specific element changed and the rest pixel-stable
- The image contains text or logos that must not regenerate
- The subject's exact pose or position matters
Outpainting Recipe: 1:1 to 9:16 for Stories
You have a beautiful 1080 × 1080 square product shot. You need a 1080 × 1920 9:16 for Stories. Don't re-shoot.
Workflow:
- Create a 1080 × 1920 canvas, transparent, and paste your 1080 × 1080 image in the vertical center
- The result: a PNG where the middle third is the original image and the top + bottom thirds are transparent
- Prompt: "Extend the scene vertically, maintaining the same warm-cream linen surface, soft natural window light from the left, and overall editorial mood. Include subtle surrounding context (a small ceramic plate partially visible in the lower third, a faint soft background shadow in the upper third) without competing with the central product. Matching palette."
- "Extend the scene vertically, maintaining..." Anchors the extension to the existing style.
- "Without competing with the central product." Prevents the outpainted area from introducing a second focal point.
- Specific small elements ("a ceramic plate partially visible") give the model something concrete to put in the extension, reducing generic/empty outputs.
When gpt-image-2 Is the Right Edit Engine
gpt-image-2 shines at edits when:
- You need mask-based precision. OpenAI's Images API has first-class mask support. The model respects mask boundaries more strictly than prompt-only reference approaches.
- Your input has high-detail references. gpt-image-2 processes input images at high fidelity automatically, preserving product details, textures, and fine features across the edit.
- Your edit is on a Pro-tier post. The per-edit cost is acceptable when the post is a campaign hero, launch announcement, or press image. Quality matters more than cost at that tier.
- No transparent output on edits. If the edited region should be transparent (isolated product on alpha), you'll need to remove the background in post-production.
- Aspect ratio support is narrower than Nano Banana 2's. For unusual input dimensions, the edit endpoint sometimes fails or pads silently.
- Generation time is real. Complex edits can take noticeably longer than prompt-only changes. Plan UX accordingly (streaming previews help; stalled spinners hurt).
When to Route to Nano Banana 2 Instead
Nano Banana 2 (Google's `gemini-3.1-flash-image` on Vertex AI) handles its own editing workflows differently — it leans on prompt-based reference rather than explicit masks. For some workflows that's a strength, for others it's a limitation.
Route to Nano Banana 2 for editing when:
- Prompt-based batch edits. When strict mask precision is not required, a prompt-based reference edit can be faster to prepare than hand-authoring masks.
- On-image text needs to survive or be added. Nano Banana 2 handles on-image text noticeably better, especially for CJK scripts. For more on this, see our CJK text rendering guide.
- 4K output. Nano Banana 2 has a native 4K tier; for an edit that's also becoming a paid ad or a landing-page hero, this saves a post-processing upscale step.
- Prompt-based edits where you don't want to prepare a mask. "Make this more minimal," "change the mood to winter," "add subtle snow to the scene" — prompt-level edits without pixel precision are fine on Nano Banana 2 and faster to set up.
Variations vs. Inpainting: How to Choose
A decision tree:
- Is there a specific region I want to change, with everything else pixel-stable? → Inpainting with a mask.
- Am I changing the overall mood, palette, or time-of-day, not a specific element? → Variations.
- Am I extending the canvas? → Outpainting (which is inpainting with the new area as the masked region).
- Is this a "try something different with this composition" exploration? → Variations, treat outputs as concept starts, not final pixels.
Common Editing Mistakes
Masking too tightly. If your mask cuts right at the edge of the subject, the model has no buffer to blend the edit. Leave a 5–10 pixel feather around the mask so edits blend naturally.
Prompting too generically. "Change the background" is too vague. "Replace the background with a soft cream linen surface, gentle natural window light from the left, subtle diffused shadow beneath the product" is actionable. Over-specify rather than under-specify.
Forgetting to describe what to preserve. "The product itself must not change" or "Keep the subject's pose and expression identical" helps the model respect the unmasked boundaries.
Using variations when you need inpainting. Variations drift — you'll get a result that "feels close" but isn't pixel-stable. For client-facing product work or brand-critical imagery, always prefer masked inpainting.
Not matching lighting between original and edit. If your original is warm afternoon light and your prompt says "bright cold morning light," the edited region will clash. Describe lighting consistent with the source.
Neglecting output format. Always export editing input and mask at the same dimensions as your target output. Mismatches cause silent failures or pad artifacts.
Practical Workflow: A Week of Edits for an Ecommerce Team
An ecommerce team can run this workflow:
Monday: Plan
- Identify the images that need editing this week: background swaps for a seasonal palette, product-element replacements, and any crops that need canvas extension.
- Prepare masks for the edits that require pixel-level control. Export each mask as a matched-dimension PNG with alpha.
- Run mask-based edits through the OpenAI Images API workflow. Use Adpicto's in-app prompt-based edit path for source-image edits that do not require an uploaded mask.
- Review outputs. Re-run any edit that changed protected areas or missed the masked-region brief.
- Drop finalized edits into Canva for any overlay text, final brand-typography pass, and export at correct dimensions for Instagram feed, Stories, Facebook, and the product page.
Tired of regenerating from scratch when you only need to change one thing? Start with Adpicto free — no credit card required, 5 AI-generated images per month on the free plan.
Edits Are Where the Time Actually Saves
Pure generation is the party trick that sold AI image tools to you. Editing is the workflow that makes them keep their seat in your stack. Once you're comfortable with masks, inpainting, and outpainting, you'll find most of your real time savings come from this loop:
- Generate a base image (or use an existing one)
- Edit the one thing that's wrong
- Ship
Related Articles
gpt-image-2 for Instagram Post Images: One Anchor Image, Every Format
Turn one gpt-image-2 reference image into every Instagram surface — 1:1 and 4:5 feed, 9:16 Stories/Reels cover, and a consistent carousel — via outpainting, reference anchoring, and mask edits.
gpt-image-2 for Restaurant Menu Images: Prompt Recipes for Announcements, Seasonal Cards, and Photo Fixes
How to use gpt-image-2 to turn a real phone photo of tonight's dish into a publish-ready menu graphic: announcement recipes, seasonal promo cards, and honest photo-enhancement mask edits.
gpt-image-2 Inpainting Guide: Masks, Prompts, and Fixes
Learn gpt-image-2 inpainting for social image edits: prepare masks, write masked-region prompts, run multi-pass fixes, and avoid seams or edge bleed.
Try this image workflow in Adpicto
Adpicto routes between gpt-image-2 and Nano Banana 2 automatically — generate and edit images straight from a prompt.
Create an image freeNo credit card required · 5 free images per month